Tuesday 24 November 2015

Some Old West Minis Getting Ready for Painting.

My High Moon project is making only very slow progress. This is due to a lot of things, most notably real life getting in the way all the time. With the 'tatoes well under roof, though, I should be able to squeeze in more hobby time over the next month or so, until after Christmas, when I have to fell some trees/bushes, and cut back a lot of branches, in the back garden.

But, for now, I have gotten the minis for out lead character ready for priming. Duregar/Ulolkish, who is going to play him, will be painting it, so, hopefully, we should be able to play the first scenario somewhen in January (I also have to paint some models, but when I get started, they should not take me too long).

Here's our (anti)hero, both mounted and dismounted. The minis are from Foundry and Knuckleduster.


Monday 23 November 2015

Usuthu! Zulu War (1879) British WIP

Well, time seems to fly away on the wings of ornithopters these days.

I have been busy getting the last potatoes out of the soil, as winter has finally arrived with forecasts of -10 C this night, so I thought I had better.

I have not been completely idle on the hobby front, though, and I have assembled my first five British infantrymen for my Africa/Zulu War project.


As you can see, some of the ready/advancing stances are almost passable, but the shooting stances are really horrible.

Unfortunately, each sprue comes with only three sets of arms for each stance, so I have to use two sets of shooting stance arms out of every five models (with twenty in the set).

There is a right arm with an empty hand that may be usable with the extra Martini-Henry provided, so I think I shall try out that option from the next sprue.

I still think these will be OK as assegai-fodder at an arms length when I have given them a table-top quality paintjob, but I certainly shall not be adding more of them to my collection (unless someone actually throws them at me just for taking them).

I shall add some 'rough' to the bases with some filler, and then they are ready for priming!

Thursday 12 November 2015

Weird 'Sight' on a Long Colt?

I have been cleaning up a Foundry mounted U.S. Cavalryman for my Old West project, but I stalled when I reached his Colt.

It looks like there is a sight 2/3 down the barrel, instead of near the muzzle, and this baffles me a bit.

I wonder if any cavalry revolver actually looked like this, or if it is just the result of a casting vent on an old mold?

I would be much obliged if any of my readers can shed some light on this for me, as I haven't been able to find anything on the matter...

Tuesday 10 November 2015

Celebrating a Catholic Saint.

In Denmark, it is tradition to celebrate 'Mortensaften' (Eve of Saint Martin of Tours) on November 10th (we always celebrate on the evening before the actual day here, like Christmas Eve, Saint John's Eve (Midsummer), New Year's Eve, etc.) with a feast of bird.

Originally, the bird was a goose, as Martin of Tours is said to have hid in a goose pen to avoid being appointed Bishop of Tours, but the geese, startled by the monk coming into the pen, cackled and thus gave him away.

With households having shrunk to a mere 2-5 persons, though, most people these days feast on a roast duck instead, as it is a more manageable meal.

Here in Denmark, much winter's food (like pork roast, roast poultry, 'medister' sausage, etc.) is served with 'browned potatoes' which is small cooked and peeled potatoes covered in caramelized sugar on a hot pan, so, naturally, I have prepared some 'tatoes for todays supper, too.

Now I shall go for an eight kilometer walk with the dog to get my appetite up for tonight, before I put prepare the duck for the oven.

Then it is time for doing some tidying up in the house (we had a delayed Halloween party in the attic Saturday, and I had to remove some of my boxes from up there to make space for the kids - so now I have to make space for the boxes in the conservatory, which means sorting out the contents of some of the boxes already there, and see what I can ditch, and what I need to find storage room for)...

So, probably not much hobby time today, but I hope to be able to report some progress tomorrow!


Monday 9 November 2015

USUTHU! - Another Project Born...

'Zulu!' and 'Zulu Dawn' have long been my favourite films depicting redcoat action in the Age of Imperialism, and I have felt the itch to get some action going on the South African plains (and as any native Africans can easily be pressed into service for Pulp games, this is actually a no-brainer).

I have now set out to scratch that itch, first getting these books from Osprey:

(In Her Majesty's Name rulebook should be in the mail any day soon)
Heroes, Villains and Fiends contain rules for using Zulu in IHMN, so I expect to start making a Company or two of Zulus (unmarried and married springs to mind), and one of Brits, then perhaps expand by making Pulp Alley leagues of some of the other native peoples available (like Ngoni, Matabele, Pygmies, Azande, and perhaps some 'fantasy' cannibals and other imaginative Africans).

At first, I thought about doing Colonials in 1/72 plastics as I already have some Esci Zulus and British infantry for the Zulu War (1879), but there seems to be a limited supply of figures for this period; although a lot of sets have been made over time (notably from HaT), only a few seem available at the present.

So, I end up - as usual - collecting and painting 28 mm sized stuff, and as I remembered to have a box of these, I dug it out and have begun prepping a few redcoats.:


The models are not great, but I got the box as a freebie when ordering WGF's Republican (Caesarian) Romans, so no harm done in getting them a lick of paint so they can be brutally slaughtered by the natives of many a distant corner of the Empire.

I shall be basing them on 20mm washers, and go for a 'ready' or 'avancing' pose for as many as possible, as I really do not  like the sculpt of the firing right arm/hand - and I am primarily going to use these for skirmishing, so it only seems right to use poses better suited for open formations.

For the Zulus, I am almost set on getting the Empress/Warlord Zulu Starter Army, which should keep me occupied for several gaming seasons.

Just need to get that November paycheck...

Wednesday 28 October 2015

Retro Raygun

Got this rule set in the mail yesterday (ordered through Wargames Emporium in the UK).

I have had some Robot Legion and Galacteer models (plus a few odd bits) from Hydra Miniatures for several years, so I thought I should finally get the rules to accompany them (and possibly motivate me to get some of them painted).

I have given the rules a quick read-through, and the system seems to be unlike everything else I have tried (which can be a good thing), making use of multiple dice for opposed rolls, and hardly any removal of single minis (except for the 'Horde' troop type), instead making use of morale type results for whole units.

I am looking forward to trying it out somewhen after having painted a bunch of minis - but the figures, especially the Robot Legion,  are likely to see use in other settings long before I get two sizeable forces ready for the table.

Tuesday 20 October 2015

Interlude

Well, I spent most of the day sorting out my household accounting/budgetting, and then got stuck in front of the computer reading forum and facebook.

BUT, I also managed to dig out some minis I am going to re-base and paint (at least some of) for the first actual High Moon game - AND, I have also ordered some packs from Foundry to have some stuff to flesh out the town.

Tomorrow, hopefully I should get stuck in and get some work done!

Sunday 18 October 2015

Testing High Moon: Dead Reckoning

I had my regular gaming buddy ulolkish/Duregar come by my house to roll some dice for testing the mechanincs in the Two Hour Wargames Reaction System.

As expected, we had to look a lot of things up, and often had to discuss how to resolve a tricky situation, or to read an example a couple of times to get our heads wrapped around the workings of the rules, but Duregar agreed with me on the potential of the rules.

I did not take any in-game pics as such, as we were only playing through some of the STOP!-boxes to see how the rules worked in action, but I shot a couple of the set-up after Duregar left (after having generated a character for future adventures in the Weird Wild West).

First, one from the top, where it can be seen that Doc Holliday Ducked Back from Wild Bill Hickok's bullets into the soon-to-be small saloon.


And another view down the street. Even though I have not done anything to the raw mdf-surfaces, yet, I can already see how atmospheric the games are going to be when I add civilians, scatter terrain, and some signs and colour to it all.

I am really happy with my decision to go the mdf-route for this project - especially the possibility to just lift off a roof and gain access to the interiors of a building will be such a game-changer over the alternative use of a buildings footprint!


Thursday 8 October 2015

Vacation 2015 - Day 8: Relaxation!

After a very hot trip to Venice, we stayed in Camping Oasis the next day (we may have taken a trip into Sottomarian to buy som food, but that's all).

Here, Lea is taking a soda break from eating wonderful sun-ripe grapes. As you can see, she has been in either the ocean or the pool.


My wife also ejoyed the shadow, and some fridge-cooled water.


My ever-creative eldest offspring was drawing (when she was not reading or frolicking in the pool).

Of course, we also planned what to see next, and the consensus fell on Pisa, and in particular the famous leaning tower.

So, my next post about our stay in Italy will be about a full day's trip from Sottomarina to Pisa, and back.

I have a plethora of photos to edit, first, so a few days will most likely expire (and we are also going to London  on a 5-days trip soon, so I may not get around to do something about it, right away).

Sarissa Old West Sheriff's Office.

Today, I dis some work on the Sheriff's Office. I have not yet glued the cell bars in place, and I also have to glue the small 'SHERIFF' sign in place et the front, but I am quite happy with the result so far, as I was at work last night, so slept some of the day.


As you can see, this later design has some detail cut into the flat roof - so now I have to figure out what it represents.

Another progress in design is represented by the tiny tabs holding the pieces in place for packaging now being left at the corners. This means that they disappear completelly into a corner highlight instead of leaving a lightter mark down the piece when sanded down.


This is the first kit with actual inner walls I have assembled - and the connectors holding the room separator in place had to be sanded down, just like the tabs on the roof supports, thus allowing me at a later point to blend them into the outer walls with some filler before painting.

The tab on the front sign has been sanded down, likewise.

The Sheriff's Office is the last of the buildings I purchased in this batch, so when I have glued the cells, it is time to look for props to make the most important buildings (Saloon, Bunk House, Doctor's House/Farmers Shack), and get some Townsfolk to populate the street(s) and stores.

And, of course, to start getting some games together!

Wednesday 7 October 2015

Building More Sarissa Old West Buildings.

Well, I finished these in one go, actually.


 As you can see, I did not get the pitched roof upgrades for these.

Although the flat, featureless roofs are not very attractive, when painted they will probably look OK - AND provide a good sniping position for the Marshall's posse when the Daltons come to town...

One little design flaw is to be seen here, though: The model with the saloon doors/swinging doors uses the exact same floor design as the other 'Small PLUS' buildings - that have a tab connecting the facade to the floor directly under the door. This leaves an unattractive hole in the floor that will have to see some filler before painting. This is, in my book, a totally un-understandable choice, as it would have been so easy to have a file without the tab-hole for cutting, thus avoiding an unecessary cut routine, AND saving the customer extra work.


I think the 'fat' building with the saloon doors is going to be my small saloon/bar for the first couple of games - it should have just enough space for a bardesk and a couple of tables - maybe even a piano.

As I did not have extra doorframes for these, I shall have to make some inside frames out of matchsticks or something similar - I like the idea of exits being clearly marked for when a character has to make a hasty retreat!

Tuesday 6 October 2015

NUTS!

Nope, not a post about Americans in WWII, sorry.

Heavy winds today, and look what I could bring in from the back garden just by covering a few square meters behind the house:


One of the next days, I shall do a more extended search of the grounds in the hazel grove.

Building Sarissa Old West Buildings.

Yesterday, I announced my recent decision to start collecting mdf-buildings for my gaming purposes, and that I had already purchased and started assembling some Sarissa Prescision Old West models.

Today, I am going to take you through building such a model. I know, most readers of this humble blog could probably easily figure out their own best practise for this, but I'd still like to share my experience.

First step is to remove the parts from the mdf-sheets. The parts are held in place by some tiny 'pegs' or 'tabs' left there in the laser-cutting process. The larger parts can be removed by force quite safely, but the more delicate pieces. like window frames, door frames, and the supports for the porch 'awnings', need a gentlier approach.

I prefer to use my trusty X-Acto to take care of all the little pegs, best done form the backside of the mdf-sheet.


After removing the parts from the mdf-sheets, it is time to remove the leftovers of the pegs. I use a P80 sandpaper, then a P240 to smooth out the surface.

I also sand all edges with the P240; it makes the buildings less clean-cut, and it also provides an instant highlight.


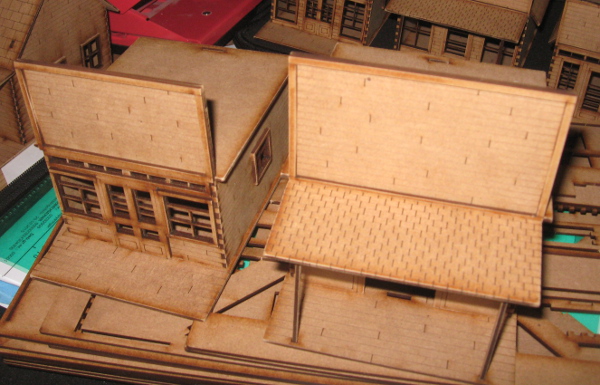
The Sarissa Old West buildings almost all have a flat roof- For some reason, only known to himself, the designer has left the roofs completely devoid of features, apart from the 'slot' that fits over a tab in the back wall. It would have been so much nicer with some texture, but I guess it would be easy to paint it as tar paper.

However, a pitched roof upgrade is available for all the basic 'main street buildings', containing an alternative back wall, two roof supports, the roof, obviously, and a door frame.


For this building, I opted for the upgrade, and I have thought up a little trick for those:

I sand down the tabs holding the roof pieces in place by about half a millimeter.


This means that a shallow recess is left where the tabs are connected - and thus I can use filler to make the otherwise rather unattractive joins disappear.


Using the upgrade kit, I suddenly have TWO door frames, which is rather handy, as you will see quite soon.

I use an old size 1 (or maybe a very worn size 2) brush to apply un-thinnd PVA glue to the backside of the door frames (or any other ornaments)


And then apply them to the outer walls.


AND the extra door frame goes on the inside to mark the door, which will be a boon when gaming. Later, when I add interior details, I shall of course decorate the door adequately.


Window frames are done the same way. Excess glue is wiped off with a wet tissue, alternatively removed with the tip of the X-Acto blade when slightly dry.

What looks like window glass, here, is actually just a newspaper photo...


When the glue on all the ornamenting has dried up properly, it's time to put up th outer walls. The building is all but finished by now.

As you can see in the picture, though, this building is designed with an 'awning' over the porch/sidewalk, so I'll have to attend to that one when the glue is dry.


Apart from the flat, featureless roofs, the design of the awnings is my only real point of criticism; the supports do not have tabs to connect to the roof, and the post holes in the sidewalk are too large for a snug fit, making this last step in the construction process the only slightly frustrating part.

In this picture, you can see what the tiny 'tabs' look like before sanding.


Although in my book a design flaw, it is a minor nuissance, and with a bit of patience - and making sure that the model sits on a flat surface - a nice result can still be obtained.

The finished building can be seen between the other two 'stores' in the picture below. You can also see, that I hadn't figured out the little trick with the roof support tabs when assembling the shack - I shall just have to see what I can do about it when I get around to painting the roof...


That is all for now. I hope this has been useful information for anyone considering to get some of the Sarissa stuff for their Old West setting - I shall not be looking for anything else than mdf when buying buildings in the future, that is for sure!

Monday 5 October 2015

To MDF or not to MDF...?

I have had some experience with wargaming buildings made from various materials.

Paper (mainly Worldworks and Whitewash City), is cheap, just needs to be printed, cut out, and glued together, is light-weight, and looks OK, especially in numbers. It is also prone to warping due to to air humidity and/or pressure, which is a big problem as I have moved my gaming activites 2/3 of the year into my un-insulated garage attic.

Resin withstands humidity, and makes truly beautiful models, but they require a lot of work; cleaning, filling and painting a large building can be quite daunting. Larger resin models are heavy, and usually not exactly cheap (including postage). Also, most resin buildings have no access to interiors, and are not easily converted.

Plastic (Renedra/Perry), very nice models, but usually slightly undersized, and rarely with accessible interiors (without extensive conversion work). Not overly expensive, but not a lot of choice out there.

So, I wanted:

  • a light material
  • a sturdy material
  • buildings with accessible interior
  • fast to build
  • large model ranges (for easy variation)
Looking at the level of perfection currently reached by manufacturers of laser-cut mdf building kits, I realized that I probably had found a viable solution. If I had any doubts, THIS wiped them all away.

Recnently, as part of my plans for playing High Moon: Dead Reckoning, I ordered some Old West buildings from Sarissa Precision, and they arrived Saturday.

I almost immediately started putting some of the models together, and I must say, I have not been disappointed.

The parts have been cut so precisely, that the only work I have to do is sanding those very small 'tabs'. left to keep the parts in place in the mdf sheets for packaging, and then glue the buildings together.

In this picture, I have finished the Shack, and have two more buildings under construction (first, window and door frames, plus the ornaments on the facade, are glued in place on the outer walls, then the building is assembled), and I expect to have at least four buildings ready tomorrow.

All roofs are lift off, with full interior access, which opens up a world of opportunities for modelling and gaming.

The best part about these is, I can use them right away, as the 'wood' look is quite fitting for the Old West, but of course I shall want to slap som paint on, especially on the facades and the interiors.

Howdy....

I have not been on here much, lartely, I know. After returning from our vacation in Italy I had a hard time getting used to working night shifts once more, especially beaceuse it was still summer, and sleeping during daytime was difficult due to much sunlight and relatively high temperatures.

Also, I was heavily disapppointed by Frostgrave, which, combined with a certain weariness of painting skeletons, left me mojo-less for some time.

During this lull in motivation, I have been cleaning up the Westwind Brotherhood models I ordered for use in Frostgrave, and also some of the animated Scarecrows I intended to use as constructs, and I have been prepping 15mm washers for basing my JTT corn/maize stalks.

All the while I was reading a lot of threads on the LAF, and notably this one caught my attention:

http://www.lead-adventure.de/index.php?topic=82110.0

I dug out an old free copy of THW's 6 Gun Sound that I have had on my harddrive for ages, and started reading.

I liked what I read, so went on to browsing the THW site to find an updated version of the rules, but, alas, they had been taken down for an overhaul.

Instead, I found High Moon: Dead Reckoning: http://www.twohourwargames.com/himodere.html

I read some additional posts on Legionnaire's Twilight Trail thread, and finally bit the bullet and bought the pdf-version of the High Moon rules. And never looked back!

Stay tuned for more about my new-found love for the Reaction System (oh, yes, there WILL be blood...!)

Tuesday 22 September 2015

Vacation 2015 - Day 7: Venice! Part 3; San Marco and the Walk Back.

Mostly pictures again today. Obviously, I could not take any photos within the San Marco cathedral.


I remember fewer people, and more pigeons, from my last visit here...


The Doge palace.


The palace from the quay side


When we got back to the car, we were all pretty exhausted, so we drove back to the camping and dropped into the pool!